gcc 로 compile 하는데, library option을 앞에 주면 오류가 나고, 뒤에 주면 오류가 나지 않는다?
$ gcc -lm -o test test.c nml.c nml_util.c
/tmp/cc4KiP0A.o: In function `nml_mat_col_l2norm':
nml.c:(.text+0x3165): undefined reference to `sqrt'
/tmp/cc4KiP0A.o: In function `nml_mat_l2norm':
nml.c:(.text+0x3257): undefined reference to `sqrt'
collect2: error: ld returned 1 exit status
$ gcc -o test test.c nml.c nml_util.c -lm
$
어떤 문법의 오류가 있는지, gcc v7 에서의 오류인지, 찾아볼 시간이 없어서,,, 기록만 남긴다.
linking 할 때 사용하는 것이라서, 뒤에 었이야 하나?
Windows 10: 보안 업데이트 설치시 0x80070643 오류 발생 - recovery location is null
Windows update 도중에 오류가 발생하고 복구가 되지 않았다.
https://sihloh4me.tistory.com/540
그래서, 여러가지 해 보았지만, 해결되지 않았다.
그런데, 마지막에 recovery partition 관련 작업을 할 때, enable 이 되지 않는 문제가 있다.
자세히 보니,
| C:\>reagentc /disable REAGENTC.EXE: Windows RE is already disabled. C:\>reagentc /info Windows Recovery Environment (Windows RE) and system reset configuration Information: Windows RE status: Disabled Windows RE location: Boot Configuration Data (BCD) identifier: 00000000-0000-0000-0000-000000000000 Recovery image location: Recovery image index: 0 Custom image location: Custom image index: 0 REAGENTC.EXE: Operation Successful. C:\>reagentc /enable REAGENTC.EXE: The Windows RE image was not found. |
Windows RE location 필드에 아무것도 없었다.
이 부분을 설정하기 위해서는, winre.wim 파일을 R:\Recovery\WindowsRE\ 폴더에 넣은 상태로
Reagentc.exe /SetReImage [옵션] 명령을 해야 한다.
이 과정을 설명하면,
1. 설치 ISO 에서 winre.wim 파일을 추출한다.
1.1. ISO 파일에서 install.wim 꺼내기
나의 경우에는 install.wim 이 아니고, sources\install.esd 파일로 존재함
(이유는 여러 배포반이 함께 있었기 때문인 듯 하며, 이 중에서 index 3 의 파일 (Windows 10 pro 버전)을 사용함)
| D:\sources>dism /get-wiminfo /wimfile:d:install.esd Deployment Image Servicing and Management tool Version: 10.0.19041.1 Details for image : d:install.esd Index : 1 Name : Windows 10 Home Description : Windows 10 Home Size : 14,729,357,679 bytes Index : 2 Name : Windows 10 Education Description : Windows 10 Education Size : 14,980,305,482 bytes Index : 3 Name : Windows 10 Pro Description : Windows 10 Pro Size : 14,977,567,093 bytes The operation completed successfully. D:\sources>dism /export-image /sourceimagefile:d:install.esd /sourceindex:3 /destinationimagefile:f:\tmp\win\install.wim /compress:fast /checkintegrity Deployment Image Servicing and Management tool Version: 10.0.19041.1 Exporting image [==========================100.0%==========================] The operation completed successfully. D:\sources>dism /get-wiminfo /wimfile:f:\tmp\win\install.wim Deployment Image Servicing and Management tool Version: 10.0.19041.1 Details for image : f:\tmp\win\install.wim Index : 1 Name : Windows 10 Pro Description : Windows 10 Pro Size : 14,977,567,093 bytes The operation completed successfully. |
1.2. “install.wim” 파일 mount
| D:\sources>dism /mount-image /imagefile:f:\tmp\win\install.wim /mountdir:f:\mnt /index:1 /optimize /checkintegrity Deployment Image Servicing and Management tool Version: 10.0.19041.1 Mounting image [==========================100.0%==========================] The operation completed successfully. D:\sources>dir f:\mnt Volume in drive F is ------- Volume Serial Number is XXXX-XXXX Directory of f:\mnt 2019-12-08 00:06 <DIR> . 2019-12-07 18:14 <DIR> PerfLogs 2019-12-08 00:00 <DIR> Program Files 2021-04-09 22:58 <DIR> Program Files (x86) 2019-12-07 18:31 <DIR> Users 2021-04-09 22:58 <DIR> Windows 0 File(s) 0 bytes 6 Dir(s) 1,040,429,035,520 bytes free |
1.3. “winre.wim” 파일 복사 (임시폴더에)
| C:\> mkdir c:\tmp C:\> copy f:\mnt\windows\system32\recovery\winre.wim c:\tmp |
1.4. “install.wim” 파일 unmount (옵션은 /discard 혹은 /commit 아무거나)
| D:\sources>dism /unmount-image /mountdir:"f:\mnt" /discard Deployment Image Servicing and Management tool Version: 10.0.19041.1 Unmounting image [==========================100.0%==========================] The operation completed successfully. D:\sources> |
참고: https://sprout13.tistory.com/54
2. “winre.wim” 파일을 Recovery partition에 복사한다.
| C:\> reagentc.exe /Disable /target C:\windows C:\> md R:\Recovery\WindowsRE C:\> attrib -h -r -s R:\*.* /s /d C:\> attrib -h -r -s R:\Recovery\WindowsRE\*.* /s /d C:\> copy c:\tmp\winre.wim R:\Recovery\WindowsRE\ |
3. “/SetReImage” 를 한다.
| C:\> reagentc.exe /SetReImage /path R:\Recovery\WindowsRE /Target C:\Windows C:\> reagentc.exe /enable C:\> reagentc.exe /enable /target C:\windows C:\> reagentc.exe /info /target C:\windows |
이제 Windows RE location 필드가 설정되어 있다.
reboot 한 후, windows update를 하니 정상적으로 완료되었다.
그럼.
NXP i.mx.8 v4.14.98-2.3.3 에서 debug symbol 추가할 때, linux-imx compile error
https://developer.ridgerun.com/wiki/index.php/Preparing_Yocto_Development_Environment_for_Debugging
Preparing Yocto Development Environment for Debugging
From RidgeRun Developer Wiki Description Setting up an environment with the appropriate tools can help developers in the process of debugging and overall analyzing a system's behavior. Yocto supports several debugging capabilities which are aimed to produc
developer.ridgerun.com
Yocto - generate debug symbol of all the included packages
I am trying to build debug symbols to be used with gdb when needed. To build debug symbols, added below in the target image target-image.inc file. IMAGE_GEN_DEBUGFS = "1" ...
stackoverflow.com
를 참고하여, image에 debug symbol을 추가할 때,
| | CC drivers/acpi/ec.o | In file included from /data/nxp/i.mx.8/4.14.98-2.3.3/ap.4/tmp/work-shared/imx8mmevk/kernel-source/include/linux/kernel.h:15:0, | from /data/nxp/i.mx.8/4.14.98-2.3.3/ap.4/tmp/work-shared/imx8mmevk/kernel-source/drivers/acpi/ec.c:32: | /data/nxp/i.mx.8/4.14.98-2.3.3/ap.4/tmp/work-shared/imx8mmevk/kernel-source/drivers/acpi/ec.c:1998:38: error: passing argument 1 of '__check_old_set_param' from incompatible pointer type [-Werror=incompatible-pointer-types] | module_param_call(ec_event_clearing, param_set_event_clearing, param_get_event_clearing, | ^ | /data/nxp/i.mx.8/4.14.98-2.3.3/ap.4/tmp/work-shared/imx8mmevk/kernel-source/include/linux/build_bug.h:30:56: note: in definition of macro 'BUILD_BUG_ON_ZERO' | #define BUILD_BUG_ON_ZERO(e) (sizeof(struct { int:(-!!(e)); })) | ^ | /data/nxp/i.mx.8/4.14.98-2.3.3/ap.4/tmp/work-shared/imx8mmevk/kernel-source/include/linux/moduleparam.h:228:6: note: in expansion of macro 'VERIFY_OCTAL_PERMISSIONS' | VERIFY_OCTAL_PERMISSIONS(perm), level, flags, { arg } } | ^~~~~~~~~~~~~~~~~~~~~~~~ | /data/nxp/i.mx.8/4.14.98-2.3.3/ap.4/tmp/work-shared/imx8mmevk/kernel-source/include/linux/moduleparam.h:234:2: note: in expansion of macro '__module_param_call' | __module_param_call(MODULE_PARAM_PREFIX, \ | ^~~~~~~~~~~~~~~~~~~ | /data/nxp/i.mx.8/4.14.98-2.3.3/ap.4/tmp/work-shared/imx8mmevk/kernel-source/drivers/acpi/ec.c:1998:1: note: in expansion of macro 'module_param_call' | module_param_call(ec_event_clearing, param_set_event_clearing, param_get_event_clearing, | ^~~~~~~~~~~~~~~~~ | In file included from /data/nxp/i.mx.8/4.14.98-2.3.3/ap.4/tmp/work-shared/imx8mmevk/kernel-source/include/linux/module.h:18:0, | from /data/nxp/i.mx.8/4.14.98-2.3.3/ap.4/tmp/work-shared/imx8mmevk/kernel-source/drivers/acpi/ec.c:33: | /data/nxp/i.mx.8/4.14.98-2.3.3/ap.4/tmp/work-shared/imx8mmevk/kernel-source/include/linux/moduleparam.h:240:1: note: expected 'int (*)(const char *, struct kernel_param *)' but argument is of type 'int (*)(const char *, const struct kernel_param *)' | __check_old_set_param(int (*oldset)(const char *, struct kernel_param *)) | ^~~~~~~~~~~~~~~~~~~~~ ... |
이렇게 오류가 발생하였다. 찾아 보니,,
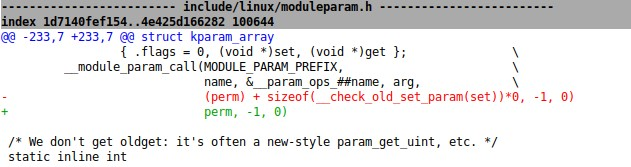
linux-imx 컴파일 도중에 발생한 것으로, linux kernel 의 include/linux/moduleparam.h 화일에서 line 236 에 문제가 있다. 다음과 같이 [ perm, ] 으로 변경하면 문제가 해결된다.
오류 메시지를 정확하게 바라보고 이해했더라면, 쉽게 찾았을 수 있었을 텐데, 계속 구글에 물어 보고, 다른 것만 찾다가 2일의 시간을 낭비했다.
설명이 두서없지만, 혹시나 도움이 되기를 바라며,
 Prev
Prev

 Rss Feed